Publishing Calendars
Our goal now is to create the html calendar, and publish it on your webs site.
Once you have entered all the events into Web Calendar Pad, the events are stores in an internal database kept on you computer.
To publish a web calendar, that event data needs to be organized, formatted, saved into html and then sent over to your web site.
Fortunately, Web Calendar Pad will do all that hard work for you automatically. We will also take advantage of the built in FTP module, to automatically transfer our files. Finally we will save our settings, so that it will be easy for us to update the calendar later.
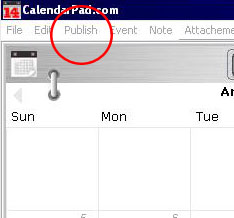 To initiate this process, from the main manual choose Publish, New Calendar.
A new form will appear, shown bellow, that will guide you through publishing a calendar.
To initiate this process, from the main manual choose Publish, New Calendar.
A new form will appear, shown bellow, that will guide you through publishing a calendar.
Publishing The Calendar
To keep things simple, we will accept all default settings and we will publish the whole calendar year. You can preview the calendar at any time by pressing the "preview button".
-
Calendar Name:
Give the calendar the name 'SoccerCalendar.html'. Once you publish the calendar to your web site, you can link to this page as the first page of your calendar.
-
Menu:
Leave the default menu format.
-
Style:
Accept the default style.
-
Months:
All months should be checked. This will publish the whole year.
-
Destination:
select "internet" for destination. You will be prompted to provide FTP login information, and the directory on the server where you want to place the calendar pages into. Information on how to transfer files can be obtained from your ISP. This example we will use our settings.
-
Save Settings:
You will leave this box check marked. Then when you
publish
the calendar, all the choices you have made on this "publish form" will be remembered and associated with the calendar name; including the destination, advance settings, and FTP information.
This will make it easy for you to update you calendar the next time. This will add link on the Main menu, under publish. And you will also be able to select the name on the publish screen, which will load that calendars settings.
-
Preview Button:
When you press the preview button, a preview of the calendar will appear in a new web browser window. This way you can review your changes (such as the chosen style) before you publish.
-
Advanced Tab:
We Will not make changes to any of the advanced settings.
-
Publish Button:
Press the publish button. The calendar will be generated, and automatically sent by FTP to your web server.
The completed Calendar is viewable here:
http://www.calendarpad.com/calendar/September2005.html
