Getting Started
Introduction
Web Calendar Pad facilitates the creation of html calendars that are easy to update and maintain, with out the need for web server side scripting or databases. The program works by storing all the users calendar data locally inside the application and then generating an html calendar accoridng to a user specified look and style. The generated html calendar produces static html pages that do not contain any javascript or scripting, and all the data is embeded inside the calendar using only html. On the server side all that is required is FTP acess to upload the calendar.
When you start CalendarPad you will be looking seeing a form similar to this.
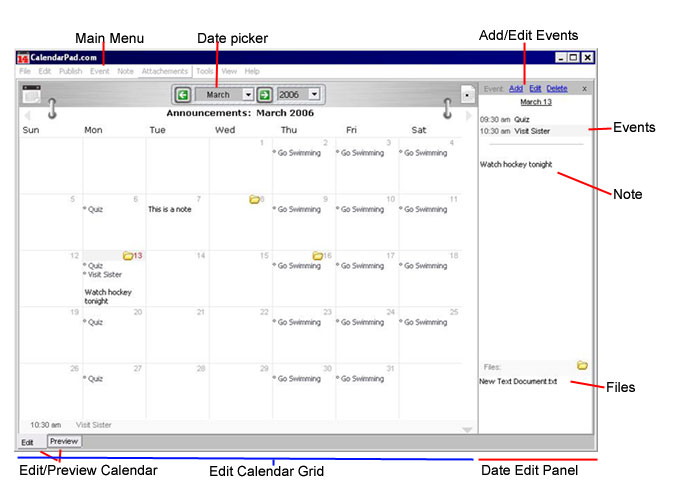
- Main Menu: Most Common Used options are placed on the main menu. Including an option to publish the calendar.
- Calendar Picker: Use to select date and year of the calendar
- Add/Edit Events: One of the two ways of enetering data into the calendar is by scheduling events. Both single day and reccuring events can be entered this way. For details see the events help page here
for
- Event: Scheduled events will appear at the top of the "Date Edit Panel". Scheduled will not appear in in the "6. Main Calendar"
- Note: For any calendar day, a note can be entered directly into the main calendar, or on the "Date Edit Panel". Notes can contain any valid html code, including links. Any html code inside a note will be inserted directly into the corresponding date field in the generated html calendar.
Maximum size for a note is 255 Characters.
- Main Calendar Panel: The Main Calendar Panel displays a monthly calendar. The Days are labeled and displayed inside of a grid, that allows a user to select days, and enter data directly into the calendar.
- Date Edit Panel: The date edit panel allows the user to see and add schduled events, and to write notes for that day.
- HTML Editor: Allows the user to edit notes which contain HTML in a nice html editor wich includes syntax highlighting.